Ik vond hier een uitstekende beschrijving die ik hieronder in het Nederlands vertaal.
Hieronder de stappen:
Hieronder laat ik je zien hoe Windows 7 op een USB stick geïnstalleerd kan worden op een NVME gebaseerde SSD.
Gaandeweg zullen we ook zien hoe we een bootable installatie partitie om de SSD kunnen maken, hoe deze vervolgens weer te verwijderen nadat de installatie voltooid is.
1. Formateren van de USB stick en copieren van de Windows 7 installatie bestanden
2. Aanpassen van de installatie bestanden zodat de setup de USB 3.0 driver herkend
3. Laad de NVME drivers naar de USB stick
4. Voorbereiding van de BIOS voor de installatie modes
5. Opstarten vanaf USB stick m.b.v. NVME drivers
6. Het gebruik van de command prompt voor de setup:
6.1 Maak een installatie partitie
6.2 Copieer alle bestanden van de USB stick naar de partitie
6.3 Maak de partitie bootable
6.4 Herstart en start m.b.v. de installatie partitie
6.5 Installeer Windows zonder problemen
6.6 Verwijder de installatie partitie
Laten we beginnen!
Formatteer op de juiste manier de USB stick
Op de computer waarop je de bestanden download/voorbereid:
1. Acquire a Windows 7 ISO file, and save it to C:\w7install
2. Take a USB 2.0 or 3.0 thumb drive (3.0 recommended) with at least 4GB capacity and plug it in.
3. Prepare the thumb drive for files:
3.1. Note: you can probably just quick format the thumb drive to NTFS, but to be safe, follow the procedure below.
3.2. Note: This will erase everything on the thumb drive
4. Open up CMD.exe as an administrator, then enter the following commands (press enter after each line):
Code: Select all
diskpart

list disk

*Find the # of the disk corresponding to your USB stick* Then enter:

select disk # (replace # with the appropriate disk number)

clean

convert mbr

create partition primary

select part 1

active

format fs=ntfs quick

assign

exit1. Go to https://wudt.codeplex.com/ and download/install the “Windows USB/DVD Download Tool”.
2. Launch the Windows USB/DVD tool and follow the steps, selecting the ISO file you placed in C:\w7install, selecting “USB”, and then selecting the appropriate USB disk. Note: the drive letter for your USB thumbdrive may have changed due to the diskpart procedure, select carefully.
3. The tool will work for a couple of minutes, extracting files from the ISO and copying them to the USB drive. Once complete, close the program.
Modify the W7 installation files so that setup has ‘native’ driver support for USB 3.0.
1. Download the USB 3.0 driver “USB 3.0 Driver for Windows 7 64 BIT” which is needed for your laptop
Note: the following instructions and images were copied nearly verbatim from the following website: http://codeabitwiser.com/2014/03/how-to ... 3-0-ports/
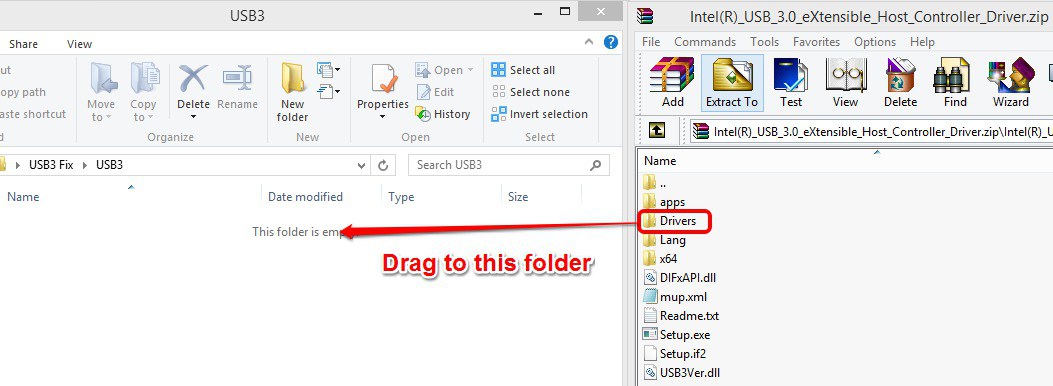
Extract the Drivers
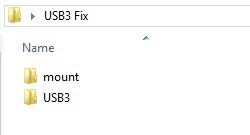
Once you download the drivers we will need to make a folder on e.g. your desktop to place the drivers in. For the purpose of this example lets just call it “USB3 Fix”.
Inside that folder create 2 separate folders: “USB3” and “mount”.
Now extract all of the drivers into that USB3 folder.
Get the “boot.wim” and “install.wim” files
** Thanks for all the comments pointing out that you also need to update the install.wim file! **
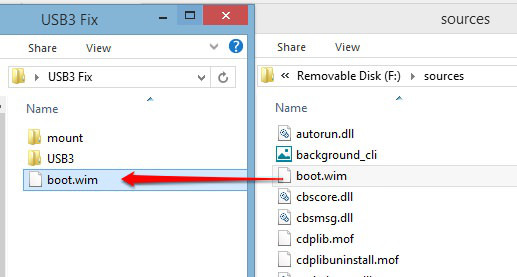
Next we need to get the files we need to install the drivers into. Open up your USB thumb drive that has your Windows 7 image on it and go the Sources folder. Move the “boot.wim” file and “install.wim” into your “USB3 Fix” folder we created earlier.
Update the “boot.wim” and “install.wim” Files
Open up your cmd shell as an administrator. (Click Start on windows 7, or Windows Key + Q on Windows 8, type in “cmd” and then right click on the cmd application and choose Run as Administrator.)
Once open, navigate to the USB3_Fix folder in the cmd shell, and type in the following commands in this order to update the boot.wim file:
Code: Select all
dism/mount-wim/wimfile:boot.wim/index:2/mountdir:mount

dism/image:mount/add-driver:"usb3"/recurse

dism/unmount-wim/mountdir:mount/commit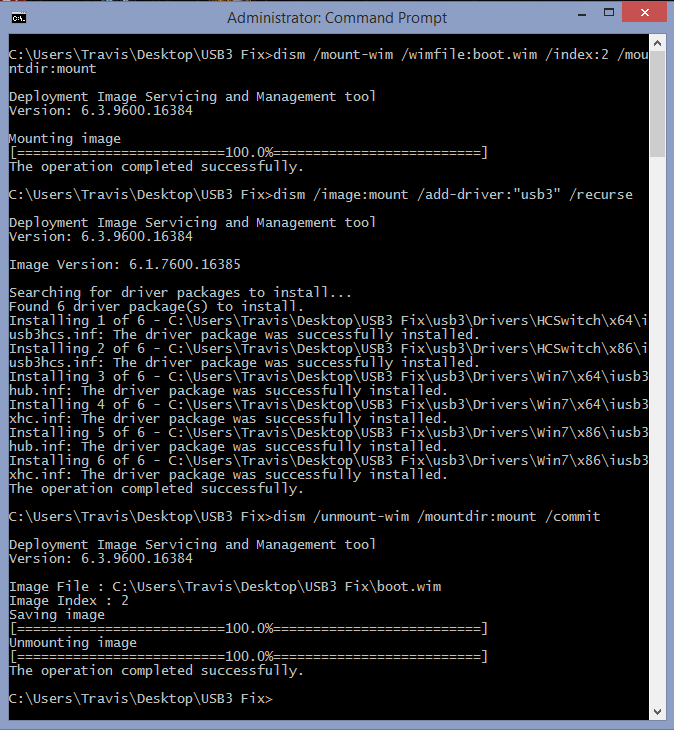
Next do the same thing to the “install.wim” file. This file has a couple different index values depending on what type of windows you are installing. You can list all of the indexes and their contents by typing in:
Code: Select all
dism/Get-WimInfo/WimFile:install.wim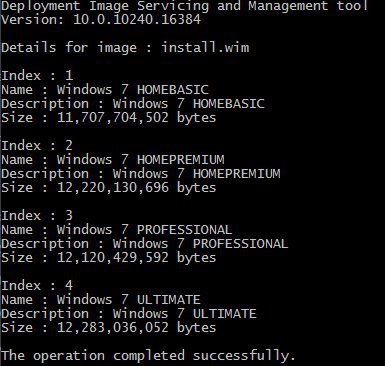
If you want to update all of them you will have to repeat the below process for each of the indexes you want to update. For me, I’m just installing Windows 7 Professional, so I’m going to just update that one.
Code: Select all
dism/mount-wim/wimfile:install.wim/index:3/mountdir:mount

dism/image:mount/add-driver:"usb3"/recurse

dism/unmount-wim/mountdir:mount/commitNow you’re done! Simply copy the modified “boot.wim” and “install.wim” file back into the “sources” directory on your Win 7 iso bootable USB thumb drive (yes to overwrite) and you're done with this section!
Load a set of NVME drivers onto the installation USB
1. Go to the following page: http://www.win-raid.com/t29f25-Recommen ... ivers.html
2. Scroll down to section G – “Samsung NVME Drivers” – and download the appropriate driver for your SSD.
Note: if given the option, get the pure driver files, not the installer set.
3. Open your W7 thumbdrive and create a folder named “nvme” in the root of the drive.
4. Copy all of the NVME driver files you just downloaded to this folder
Prepare BIOS for the installation
Ok! Now we’re done with the “working” computer and are ready to install windows. On your system:
1. *Don’t insert the thumbdrive just yet*
2. Power-on the machine, and press ‘F2’ repeatedly until the BIOS setup appears
3. Move to the ‘Boot’ page, scroll down and enter the UEFI Setting menu
Note: your BIOS layout may be slightly different than what’s written here, depending on whether or not it’s currently in UEFI Boot mode, or if you have a custom bios installed, so hunt around until you find the right setting
4. Locate “UEFI Boot” and set it to “Disabled” (this step is strictly mandatory!)
5. Now, insert your USB thumbdrive into the laptop.
6. Go to the ‘Exit’ page in bios, and Save Changes and Exit.
7. The laptop will restart - start repeatedly pressing ‘F7’ to bring up the boot device selection menu.
8. Manually select your thumbdrive.
Note: if you can’t find the thumbdrive, make sure you disabled UEFI and properly formatted (using diskpart) the installation thumbdrive as listed in the first section.
Boot from the USB the NVME drivers
1. Click through the initial windows setup pages, selecting your language and then press “Install Now”.
2. After accepting the License Terms, under “What type of installation do you want”, select ‘Custom (advanced)’.
3. You’ll now see a list of drives and partitions on your computer. If you have a non-NVME secondary drive, it will be listed here – but since Windows 7 does not yet have drivers installed for NVME, it won’t recognize any NVME SSDs. Let’s fix that.
4. Click: ‘Load Driver’ below the list of drives
5. Select Browse, and then expand the thumb drive (Likely labeled ‘Removable Disk’)
6. Select the ‘nvme’ folder, and press OK
7. You should now see a Samsung NVME Controller. Select this driver and press ‘Next’. The driver will be installed.
8. Once complete, and you’ll return to the disk selection screen and should see the NVME SSD (you may have to click refresh).
Create the installation partition & copy installation files
Note: The majority of the next section comes from the following website (modified slightly to create a separate installation partition to allow for easier removal of the installation files once setup is complete): http://druss.co/2014/07/fixed-setup...i ... -from-usb/
1. From within the Windows setup program, press “Shift+F10” to bring up the command prompt.
2. Enter the following commands:
Code: Select all
diskpart

list disk

*Identify the disk # for your NVME SSD* Now enter the following commands:

select disk #  (replace # with the appropriate disk number)

create partition primary size=30000  (you could increase this number (which represents MegaBytes, but don’t make it any smaller).

select part 1

active

format fs=ntfs quick

assign letter=R (you could change R to whatever drive letter you’d to assign to your installation partition, but from now on when I mention ‘R’, I’m referring to this letter)

list volume

*Identify the volume letter for your USB thumbstick. In my case it’s D, and that’s how I’ll refer to it from now on. Don’t worry, this will be removed prior to installation, so no need to change it*

exit

d:

xcopy d: r: /e /h /k  (again, d: is the temporary letter assigned to the thumbdrive, r is the letter you chose for the installation partition)

cd boot

bootsect /nt60 r:
1. Close the command prompt
2. Remove USB Thumbdrive from your laptop
3. Exit windows installation (click the X at the top of each window). The computer will restart.
4. Upon restart you *should* be greeted by “Windows is loading files”, similar to what you saw before. If not, and you instead receive a message to the tune of “Insert boot media”, do the following:
4.1. Restart, and immediately start pressing f2 repeatedly to enter BIOS setup
4.2. Once there, go to the boot tab, and explicitly disable every other boot device except for the NVME SSD.
4.3. Restart, and the installation partition should be found.
Congratulations! You’ve now booted from your NVME SSD for the first time!
Install Windows (finally!)
1. Again, select your language and agree to the license terms
2. Select the Custom (advanced) installation.
3. You will then be greeted by a message asking you to load a required driver.
4. Re-insert your thumb drive, and select browse.
5. Locate the NVME folder as you did before, and install the driver.
6. Once that’s complete, *remove the thumbstick* (important)
7. You should now see all drives in your computer. From here, perform a standard clean windows installation as normal:
7.1. Click “Drive Options (advanced)”
7.2. Select the unallocated space on your NVME SSD
7.3 Create a new partition (click “New”) and select the size (it defaults to maximum)
7.4 Click Format
7.5. Ensure the new partition is selected, and click “Next”.
7.6. Have a cold one while Windows does its thing.
Note: Once Windows is done with the first phase of its installation , it will reboot. After the Sager logo, you’ll get a brief 3-second flash of the Windows Boot Manager with two options: Windows 7, and Windows Setup [EMS Enabled]. Windows 7 (the first option) is selected by default. This is the correct option. On subsequent restarts, the selection delay will increase to 30 seconds. If you’re really impatient, go ahead and manually select the Windows 7 option.
Windows is installed! Hooray!!
Removing the additional start-up entry
The Windows Setup startup entry is still lingering around, so let’s clean that up before we remove the installation partition.
1. Launch cmd.exe as an Administrator
2. Type ‘bcdedit’ and press enter.
3. Find the entry for “Windows Setup”. The words “Windows Setup” will be found in its description field.
4. Select the identifier corresponding with this entry (including the brackets), and copy that text.
5. Now execute the following command: (replace {id} with the text you copied).
Code: Select all
bcdedit /delete {id}This final step will allow you to reclaim the 30GB installation partition used during this process. First we must move the ‘Boot Configuration Data’ off of the installation partition and onto the OS partition.
1. Open cmd.exe as an administrator.
2. Type the following command (assuming c: is your OS drive letter – and yes, that’s not a typo, you do reference c: twice).
Code: Select all
bcdboot c:\windows /s c:Now that we can safely boot without the installation partition, we’ll remove it and reclaim its space:
1. Download and install ‘MiniTool Partition Wizard Free’ from here: http://download.cnet.com/MiniTool-Parti ... 62200.html
2. Launch the Partition Wizard.
3. Locate your installation partition. It will be ~29 GB, and on the same disk as your C: drive.
4. Right-click and delete volume. It will become unallocated.
5. Now Right-click on your C: volume, and select “Extend”
6. Move the slider all the way to the right to consume the entirety of the free space, then select Ok.
7. Now press “Apply” (Top-Left of window)
8. The tool will not be able to perform the extension without restarting the laptop. Allow it to do so.
9. Once the tool completes it’s magic, you’ll return to Windows. If you’d like to confirm the operation was successful, do the following:
9.1. Start Menu > type ‘Create and format hard disk partitions’, and select the listed item
9.2. This opens the Disk Management interface. You should see your OS Disk as having a single volume which completely occupies the disk.
10. Congratulations....You’re done!